
Setting Up Microsoft Single Sign-On (SSO)
If you’ve ever logged into an account by skipping username/password entry and clicking a button that says ‘Log in with [Website]’ - congrats, you know what Single Sign-On (SSO) is! SSO allows all of the users in your ThankView portal to use their Microsoft credentials to authenticate themselves when logging in. Configuring this feature is an incredible way to streamline the log-in process, while also amping up your account’s security. All you have to do is create an SSO app in Microsoft Azure and connect it to your ThankView portal, we'll walk you through it!
More benefits of SSO include:
- Centralized control over who has access to your systems
- No more password fatigue, better overall password management
- Less password-related calls to IT
- Boosted productivity (faster log-ins, fewer lost passwords)
- Lowered threat of data breaches by moving authentication data off-premises
Note: This tutorial refers to a SAML 2.0 connection. Additionally, to configure SSO, you must be an Admin in your ThankView portal and an Application Admin in your Microsoft Azure account.
Step 1. Enable SSO in ThankView
First, you'll need to switch on SSO inside of ThankView. After doing this, you'll be given access to a document with set-up instructions. Keep that document open, as it will generate codes you'll need to copy and paste into Azure. Let's walk through the process.
- In your ThankView portal, click your Profile Icon in the top right corner and select Settings from the dropdown.
- In the lefthand sidebar, select the Security tab.
- Under the Single Sign-On area, click the toggle to enable Microsoft.
- You'll get a dialogue box asking for a Metadata Url, click the link that says First time setting up SSO?
- It will open a document in a new window, keep that window open!
Then hop over to Azure where we'll tackle the next step.
Step 2. Create a New Application in Azure
Now we're going to create an SSO app in Azure, make sure you're either a Global Administrator or an Application Administrator. You can share this tutorial with your IT team if you don't have the correct permissions.
- When you log into Azure, you'll land on the Enterprise applications page. In the toolbar at the top, select + New application.

- This will take you to the Azure AD Gallery, in the toolbar below the page header, select + Create your own application.
- You'll be prompted to name your app by a dialogue on the right side of the page. We recommend titling it "ThankView SSO."
- Check the third box that says Integrate any other application you don't find in the gallery (Non-gallery).
- Click Create!

Step 3. Link the App to ThankView
Now let's begin configuring our SSO app and utilize the ThankView document we generated earlier to connect it to our portal.
- You'll be taken to an Overview of your new app - under the Getting Started section of this page, select the second card: Set up single sign on. Then select SAML as your single sign on method.

- From this page, select the pencil icon on the card called Basic SAML Configuration.
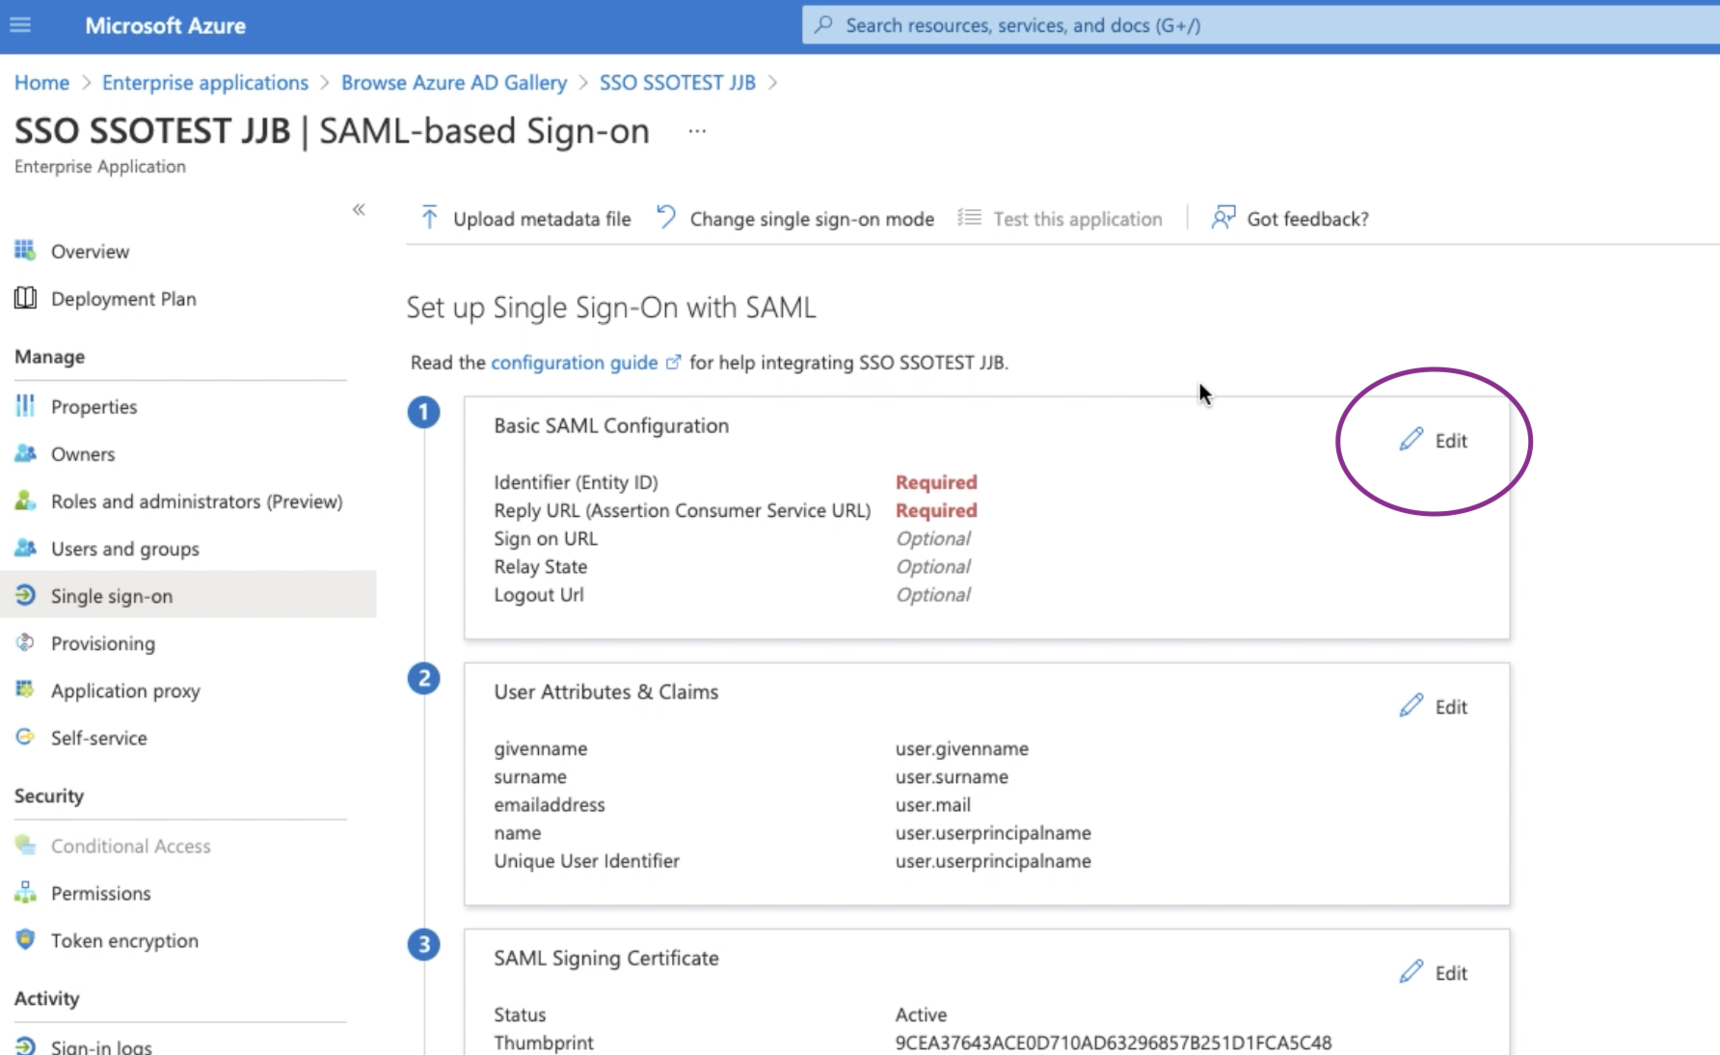
- Go back into the document we generated in Step 1 and scroll down to the Configuring Your SSO App area. Item 2 of this section will contain your portal's Identifier and Reply URL, which we will paste into Azure.
- In Azure, you should be on your Basic SAML Configuration page - input the respective URLS for fields Identifier (Entity ID) and Reply URL (Assertion Consumer Service URL).
- Click Save and then refresh your browser.

Step 4. Add Users to Your SSO App
Now we're going to add which users we'd like to have access to this feature. Make sure they're already added as users in your ThankView portal!
- In the lefthand navigation, under the section titled Manage, select Users and groups.
- Select + Add user/group at the top of your page, then click the Users and groups section.
- On the page that pops out on the righthand side, use the search bar to add users and groups - when finished, click the Select button at the bottom of the section.
- Select the Assign button in the bottom left of the page to add them to your app.

We'll also want to make sure the SSO option is visible to the users we've just added:
- In the lefthand sidebar, under the Manage section, navigate to Properties.
- Item 12 will say Visible to users? - toggle this on to say Yes.
- Click Save.

Step 5. Finish Connecting Your SSO App to ThankView
In this last step, we'll go full circle and complete the connection.
- In the lefthand sidebar, under the Manage section, navigate back to Single sign-on.
- Scroll down to the third card on this page called SAML Signing Certificate.
- The fifth element in this area will be called App Federation Metadata Url, copy this to your clipboard.

- Hop back over to your Security page in ThankView and paste that Metadata Url into the dialogue box.
- Click Enable Single Sign-On.

And congratulations, you've successfully configured Single Sign-On!
SSO Video Tutorial
If you prefer a real-time tutorial, check out our video that walks you through the process.
Misc. SSO Need-to-Knows
New Users Requesting Access
If one of your teammate attempts to use their Microsoft credentials to log into ThankView, but they're not a user in your organizations ThankView portal, they will be prompted to request access. As an admin, you will receive a notification via email and also inside of the ThankView app in your Notifications tab. If you fail to grant access within a week, you'll receive a reminder email. Once you've added them to your portal, they will receive an email notification and they're good to start using SSO!
Adjusting Notification Settings
When a user requests access, you will receive both a platform notification and email notification. You can choose to turn off the email notification.
- Navigate to Settings > Notifications.
- Select No for Email me when a user requests access via Single Sign-On.
Removing ThankView Access from Your Microsoft Organization
Although we permanently delete your Microsoft Metadata URL when disabling SSO, you can ensure that we lose access by deleting both the Identifier URL and the Reply URL from your Azure App.
If you have additional questions, please reach out to your Customer Success Representative or support@thankview.com.
Reply
Content aside
- 2 yrs agoLast active
- 405Views
-
2
Following